
Welcome to the new RK Drums website. A new, faster experience. Your account was migrated, but you will have to reset your password. Click here.

RK Drums
How-To Guide

Video How-To Assemble Your RK Drums Roaster


You can find the older, written guide here.

Grill Requirements

Grill Requirements

The specific grill requirements for each RK Drum are here.

In the video, we used a Nexgrill 5-Burner Grill from Home Depot.

We don’t recommend specific grills because it is a major task to keep track of them. Manufacturers have the freedom to change their designs at any point, and we do not have a way to stay informed about their design changes. If we recommended a specific grill, it is possible that the manufacturer changes could make it incompatible with the RK Drum at any time. Most grills will work with the RK Drum, and you can verify your grill selection by carrying along a small tape measure with you when you go to get yours.

Overview of Parts & Tools

List of Tools
  • Allen Wrench

  • Center Punch (or alternatively, a Hammer & Nail)

  • Drill & Drill Bits

  • Needle Nose Pliers (optional)

  • Pencil

  • Ratchet

  • Tape Measure

  • Wire Cutters (optional)

  • Wire Strippers (or alternatively, Scissors or a Knife)

  • Wrench

Getting Started

Parts Required in this Step

Rotisserie, Bearings, Collars, RK Drum, Bracket(s)

You’ll be sliding all the components onto the rotisserie rod and positioning the RK Drum in the grill.

Tools Required in this Step

Allen Wrench

Order of Parts on Rotisserie Rod

Collar – Handle – Collar – Bearing – Collar – Drum – Collar – Bearing (optional)

The optional last bearing is only needed if you are using two brackets to support the RK Drum. Note that 2 bearings/brackets are only recommended for the 12LB RK Drum.
Bracket Installation

Parts Required in this Step

Bracket, Hardware

Tools Required in this Step

Ratchet, Wrench

If the manufactured holes in the grill do not line up with the holes in the RK Bracket, then the following tools will be needed: Pencil, Center Punch (or Hammer & Nail), Drill.

2nd Bracket Installation (12LB RK Drum only)

Parts Required in this Step

Bracket, Hardware

Tools Required in this Step

Ratchet, Wrench

If the manufactured holes in the grill do not line up with the holes in the RK Bracket, then the following tools will be needed: Pencil, Center Punch (or Hammer & Nail), Drill.

One Bracket or Two?

Two brackets are required ONLY for the 12LB RK Drum. Generally, an additional bracket for the smaller drums is an encumberance, and is better left out for the smaller drums.

Rotisserie Setup

Parts Required in this Step

RK Drum and Rotisserie Assembly

Tools Required in this Step

Allen Wrench

Motor & Plates Setup

Parts Required in this Step

Base & Motor Plates, Hardware, Motor

Tools Required in this Step

Center Punch (or Nail & Hammer), Drill, Pencil, Ratchet, Tape Measure, Wrench

Important Notes

Place the motor with as much space as the platform and rotisserie rod will allow away from the drum and heat. As a minimum, you need 3 inches between the grill lid and the motor. Shorter than that, you may have some heat problems with the motor and couplers.

The RK Drum needs to be level in order to produce an even roast. It is a good idea to use a bubble level to make sure this is the case. This is more important with the smaller drums that don’t use a bracket on both sides.

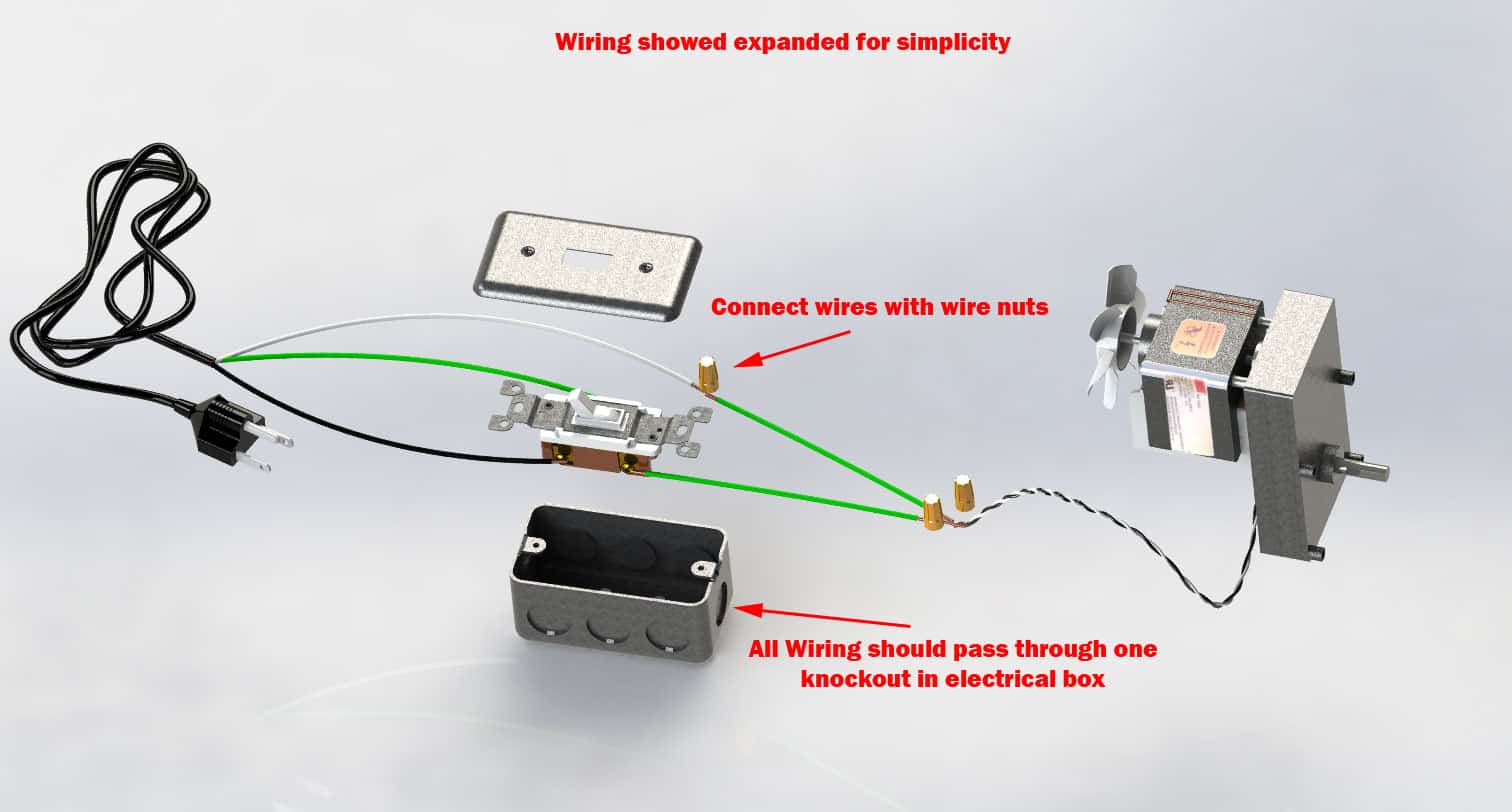
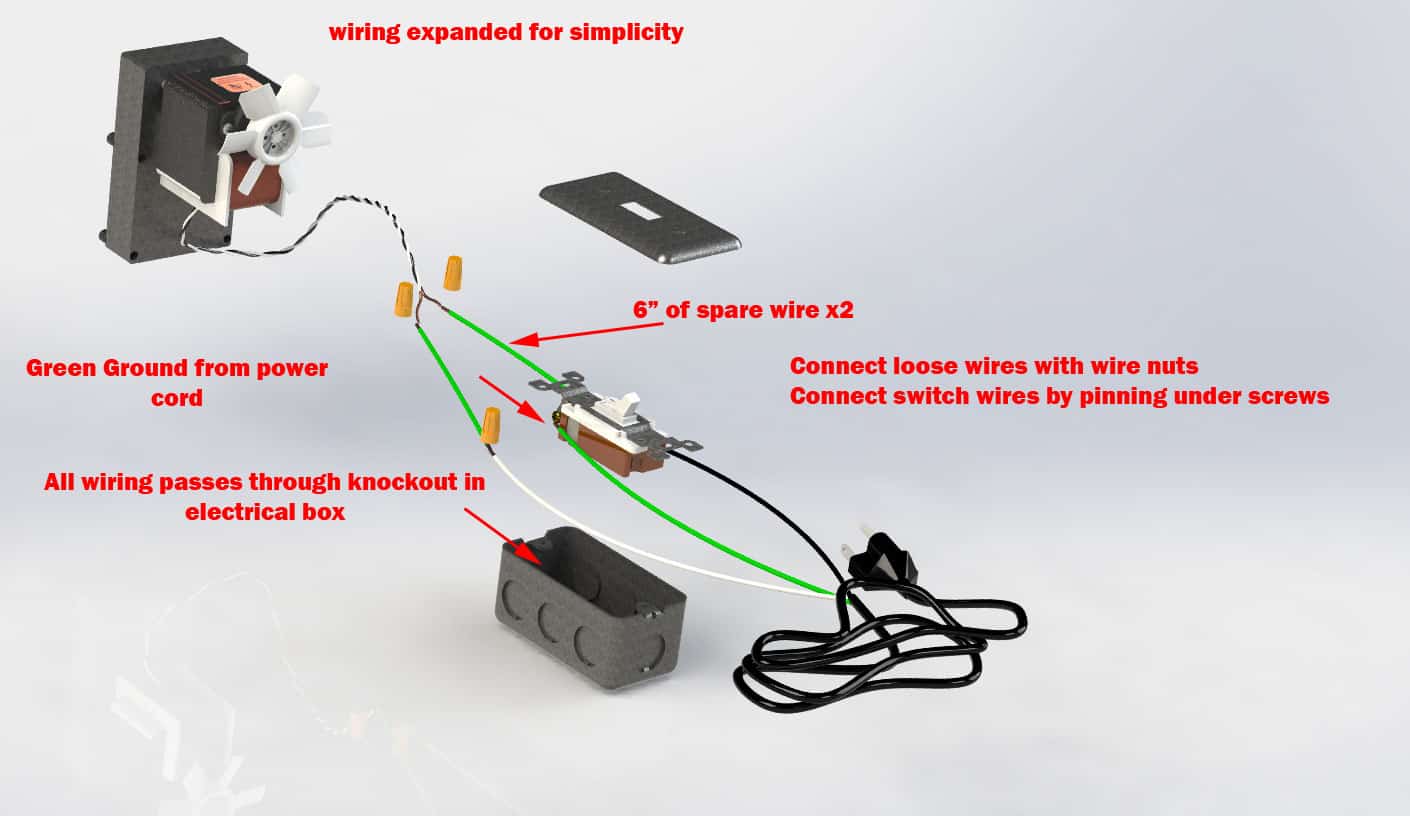
Electrical Wiring

Parts Required in this Step

Electrical Box & Switch, Motor Fan, Hardware, Power Cord

Tools Required in this Step

Pliers, Screwdriver

Electrical Diagram #1

electrical assy1

Electrical Diagram #2

Thermometer Relativity

This video is entirely educational, but is helpful information for understanding how to roast with the RK Drum.

Thermometer Install

Parts Required in this Step

Thermometer, RK Drums – Grill Assembly

Tools Required in this Step

Center Punch (or Hammer & Nail), Drill & Drill Bit,

Burn In

Gas Flow Problems?

Make sure to turn off all the grill valve controls and close the propane gas valve when you hook up the tank. If you do not, the safety features in the tank will prevent gas from flowing. To correct this, disconnect the tank and close all the valves. Then, reconnect the tank.

Burn In

Burn in the RK Drum to 500°F for 30 minutes. After the burn-in, re-tighten all of the nut & bolts and screws or after the 2nd or 3rd roast, they may work their way loose.

Efficiency Modifications

The instructions for the sheet metal mods Shane mentions can be found here.

Final Checks

Last Checks

Level the RK Drum with a bubble level

Re-tighten all the nuts & bolts and screws.

How did your build go?

Let us know how your build went. Did you find a different way to build yours? Did you have a problem with any of these steps? We’d also love to see how your roaster turned out! Send a picture of your finished roaster to customerservice@rkdrums.com.